Immediately we’re making an excellent cute foldable origami shark. This shark paper craft doubles as an origami bookmark. This origami shark craft is nice for youths of all ages at dwelling or within the classroom. The completed origami bookmark makes a cute selfmade present.

Origami Shark Bookmark Craft
Let’s make this lovely origami shark bookmark!
- Older youngsters (Grades 3 & Up) will have the ability to observe the step-by-step folding instructions to finish the origami themselves.
- Youthful youngsters (Kindergarten – 2nd Grade) may also help fold and embellish your lovely paper shark craft.
Associated: Extra Shark Week enjoyable for youths
Seize some sq. paper and observe our straightforward origami shark directions to take advantage of fearsome bookmark!
This text comprises affiliate hyperlinks.
Find out how to Make an Origami Shark Bookmark

Provides Wanted To Make Origami Bookmark

Step by Step Folding Instructions for Origami Shark Bookmark
Step 1
For step one, select the colour of the shark you need to make. I selected a light-weight blue for the right shark colour.
Step 2
Flip your sq. origami paper diagonally and fold over so every nook is touching one another forming a big triangle (see step 2 image).
Step 3
Take the 2 pointed sizes and fold them as much as kind one other smaller triangle (see image).
Step 4
Open up the 2 sides you simply folded and take the highest piece of paper and fold it down till it touches the purpose on the backside. (see step 4)
Step 5
Take the 2 sides and fold them into the pocket you created in step 4 (see step 5).
Step 6
Flip your complete paper the wrong way up and you’ll have your primary form completed.
Step 7
It’s time to embellish! First, begin by chopping out shark enamel utilizing your scissors and white card inventory.
Step 8
Then reduce out a triangle for the mouth utilizing one other sheet of origami paper. I used a light-weight pink for the within of the shark’s mouth.
Step 9
Glue the enamel onto the within of your face. That is additionally the time to attach in your googly eyes and mouth piece.
Step 10
All that’s left to do is reduce out just a few triangles for the fins and don’t overlook the dorsal fin! Glue these on and you might be performed together with your Origami Shark Bookmark!

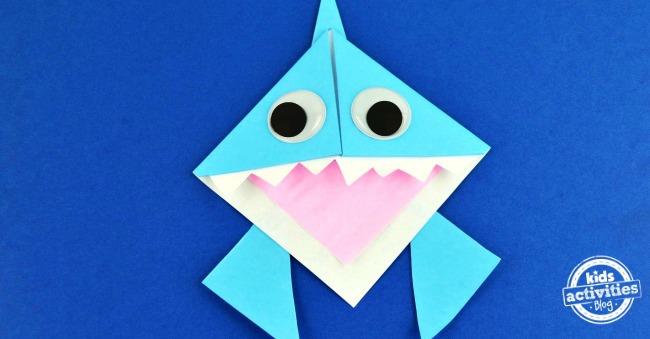
Completed Origami Bookmark Shark Craft
When you find yourself all mentioned and performed, it can appear like the shark bookmark is biting into your guide! Each time you cease studying, your origami bookmark shark goes to present you a smile.

Origami Shark Bookmark Craft Customization
Whereas some sharks may be completely terrifying, different sharks may be completely cute and innocent.
“Good day, my identify is Bruce!”
-Sure, I simply quoted Bruce from Discovering Nemo!
Your youngsters can select how one can embellish your origami shark craft, however my vote is for the kinder, gentler extra fuzzy feeling shark!
Lively Time
5 minutes
Whole Time
5 minutes
Issue
straightforward
Estimated Price
free
Supplies
- Origami Paper (the 6-inch x 6-inch dimension)
- White Cardstock
- Googly Eyes
Instruments
- Scissors
- Craft Glue (the clear drying form)
Directions
- See the pictured steps above for extra clarification.
- Fold your coloured paper in half diagonally making a triangle.
- Take the 2 pointed ends and fold up.
- Open the perimeters you simply folded and fold down till it touches the underside.
- Take two sides and fold them into pocket you created in step 4
- Flip paper the wrong way up and you’ll have shark form completed
- Enhance with enamel, mouth colour (we used pink), googly eyes and add a shark fin and fins.
- Pocket in mouth doubles as a nook bookmark.
Extra Shark Week Enjoyable from Children Actions Weblog
How did your origami shark craft prove? Is the origami bookmark biting your youngster’s favourite guide?