

Let’s make a colourful fall tree utilizing pine needles as our portray instrument!
This colourful fall tree artwork is made by dipping pine needles into acrylic paint after which onto paper. Children are going to like getting messy with this enjoyable artwork mission.

This fall tree artwork mission is enjoyable for youths of all ages. They may love dipping pine needles into paint, mixing colours, after which dabbing the paint-covered pine needles onto paper. We love this craft as a result of it’s cheap, enjoyable, and no tree will look the identical.
Alternatively, pour your paint colours onto separate plates and paint quite a lot of bushes in numerous colours as a substitute of utilizing each shade on only one tree. Present the youngsters photos of bushes with fall leaves on them to allow them to see the entire stunning colours there are.
I did this artwork mission with preschool youngsters as a part of our tree examine unit. We checked out photos of pine bushes, they usually touched pinecones and pine needles too.
Associated: Extra pine needle art
The best way to make a fall tree portray utilizing pine needles
Collect sprigs of pine needles together with acrylic paint in fall colours. Children will dip the pine needles into the paint after which onto paper. Allow them to combine the paint colours collectively and stamp or sweep the pine needles throughout the paper. Don’t neglect to put on artwork smocks as a result of this artwork mission can get a little bit messy.

Provides wanted to make pine needle artwork
- Pine needles
- Development paper
- Acrylic paint – in assorted fall colours
- Paintbrush
- Paper plate
Directions for portray a fall tree utilizing pine needles

Step 1
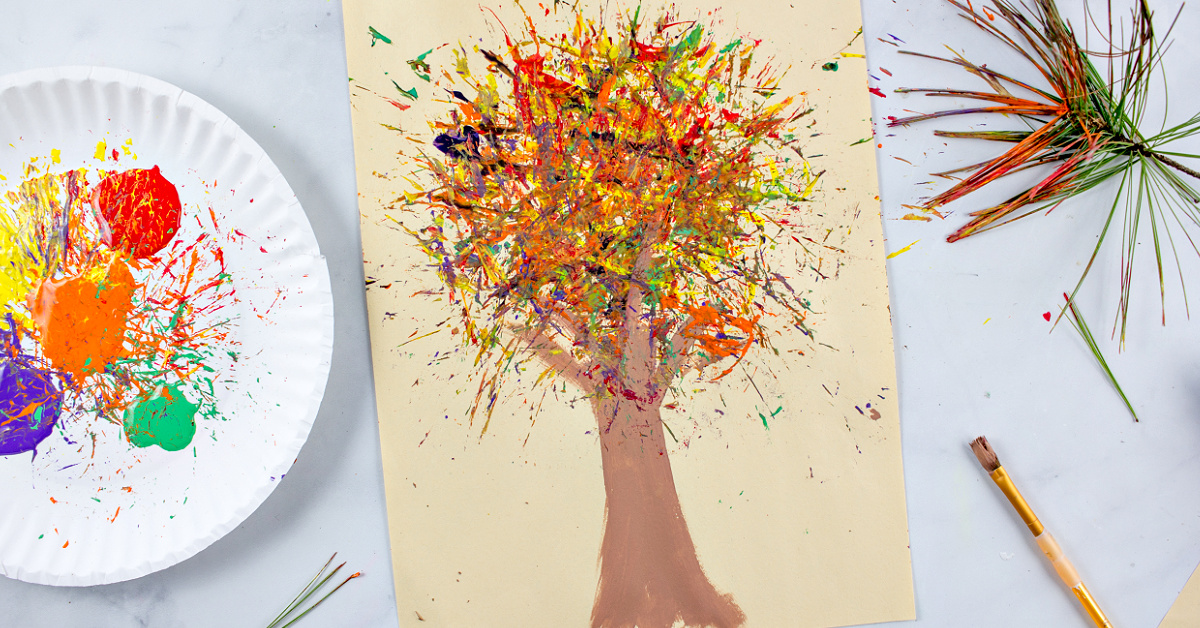
Put small quantities (at a time) of acrylic paint onto the paper plate. We used the autumn colours inexperienced, orange, yellow, crimson, and purple for our artwork mission.
Dip the pine needles into the paint, after which onto the paper. Proceed this course of over and over. The colours will mix collectively a little bit on each the plate and the paper, however that’s okay. Attempt to have the youngsters simply paint the highest half of the paper. If vital, you’ll be able to fold the piece of paper in half in order that they solely paint one part.
Portray tip: Be certain to guard your portray floor and put on an artwork smock. This is usually a very messy mission as a result of the paint will splatter a little bit.

Step 2
Utilizing your paintbrush and brown acrylic paint, add a tree trunk and branches to your tree.
We added extra paint splatters utilizing the pine needles excessive of our tree branches so it regarded like leaves have been over them too.
Our completed fall tree pine needle ART

Supplies
- Pine needles
- Development paper
- Acrylic paint – in assorted fall colours
Directions
- Pour small quantities of paint (inexperienced, yellow, orange, crimson, and purple) onto a paper plate.
- Dip the pine needles into the paint after which onto the paper. Attempt to have the youngsters paint simply the highest half of the paper. Repeat the dipping and portray as usually as they like till they’re proud of their portray.
- Using the brown acrylic paint and a paintbrush add a trunk and branches to your tree.
Extra fall artwork tasks from Children Actions Weblog
Have you ever made artwork utilizing pine needles? Did you make our fall tree, or did you paint one other image?