
Let’s make a paper plate bunny craft that works nice as a paper plate Easter crafts for youths of all ages. Crafted with easy gadgets like paper plates, pipe cleaners, cotton balls and felt or paper scraps, this paper plate bunny can tackle completely different appearances and works nice within the classroom, at house or at church.
Paper Plate Bunny Craft for Youngsters
This can be a cute Paper Plate Easter Bunny Craft that your children will love making. We love paper plate crafts in our house and I do know you’ll get pleasure from displaying this lovely Easter bunny craft that your children could make.
Paper plate crafts at all times make the proper preschool Easter craft as a result of they’re cheap as a result of they require provides you normally have already got (or can substitute gadgets you might have readily available), solely want a bit little bit of arrange and the precise crafting time for the children is on common quarter-hour.
Find out how to Make a Paper Plate Easter Bunny
It’s superb how easy day by day objects could be remodeled into one thing cute and artistic in a matter of minutes. You’ll solely want a couple of widespread craft provides to make this Paper Plate Easter Bunny Craft.
This text comprises affiliate hyperlinks.
Provides Wanted to Make Paper Plate Easter Bunny Craft

Directions for Paper Plate Easter Bunny Craft
Step 1

First, take one of many paper plates and lower it into thirds, like proven.
You received’t want the center piece.

The 2 sides will turn out to be bunny ears.
Step 2

Subsequent, utilizing scissors lower out of the sunshine pink craft felt a form that’s smaller than the ears. This may turn out to be the interior a part of the Easter bunny ear.
Paper plate craft tip: I simply eye-balled it. When you get the form proper, lower out an equivalent form from the sunshine pink felt.
Step 3
Glue the pink interior felt ear lower outs to paper plate ears with the varsity glue, like proven.
Step 4

Now let’s work on the Easter bunny head!
- Make a small pink coronary heart lower out from the pink felt.
- Take the opposite paper plate and glue the small coronary heart form onto the center of the plate with the varsity glue.
Step 5
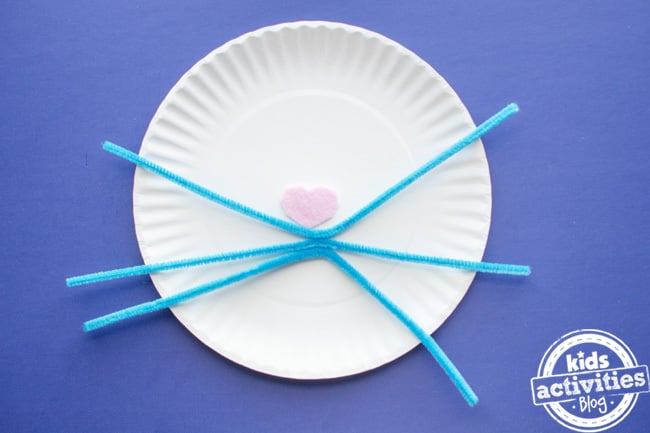
Take your 3 pipe cleaners and glue them just below the nostril with the recent glue gun. Bend the highest and backside whiskers barely.
Paper plate craft tip: Older youngsters can most likely do that half on their very own, however a grown up might want to assist youthful children.
Step 6

Then glue the cotton balls onto the pipe cleaners with college glue, like proven beneath. We used 3 cotton balls on either side.
Step 7

Utilizing the varsity glue, adhere the googly eyes onto the Easter bunny.
Then take a black marker and draw the mouth and tooth.
Step 8

Lastly, you possibly can connect the ears to your Easter bunny with a single staple per ear. For a of completion I used the remaining gentle pink felt and added a bit bow tie for our Easter bunny. I additionally rounded out the highest of my bunny’s ears.
Our Completed Paper Plate Bunny!

Isn’t this Paper Plate Easter Bunny Craft so lovely?! We hope you might have a lot making him as we did!
One other Paper Craft: Make paper dolls
Our Expertise With This Simple Bunny Craft
We cherished making these lovely bunnies with paper plates and cotton balls. All little bunnies want enjoyable whiskers! This DIY Easter bunny craft was among the best concepts for my little ones. They’re not fairly skilled with crafts to make difficult Easter decor or gadgets like garland, wreath, a bunny card, foam cup bunnies, however slightly are nonetheless constructing their artwork expertise with easy crafts. My preschooler did fairly a bit higher with this simple Easter bunny craft than my toddler, but it surely’s nonetheless simple peasy sufficient that my toddler bought to take part in simple Easter crafts. And if you end up completed making your paper bunny, you possibly can grasp it up on the fridge, give it to grandparents, do one thing particular with it for the kiddos.
Step by Step Instructions Overview – Paper Plate Bunny

I really like cute bunny crafts that don’t take quite a lot of effort. And as you possibly can see, the steps are easy and enjoyable to do. And it’s a pleasant change in tempo from DIY Easter eggs, Easter basket, and Easter bunny playing cards. Making your very personal paper plate Easter bunny is simple sufficient for youths of all ages and simple sufficient for a easy on a regular basis mother to place collectively (we all know how restricted free time could be.)
Prep Time
5 minutes
Lively Time
quarter-hour
Complete Time
20 minutes
Problem
simple
Estimated Value
$5
Supplies
- 2 paper plates
- 3 pipe cleaners for the whiskers
- 6 cotton balls
- 2 medium or massive googly eyes
- 1/2 sheet of sunshine pink craft felt
- Faculty glue
Instruments
- Glue gun and glue stick
- black marker
- Scissors or preschool coaching scissors
- Stapler and staples
Directions
- Lower one paper plate into thirds and discard the center piece – the 2 exterior items might be used as rabbit ears.
- Lower out interior ear shapes from pink felt (you can additionally coloration the within of the paper plate ears with pink marker or crayon).
- Glue the felt into place.
- Lower a small coronary heart from the felt and glue because the bunny nostril in the midst of the second paper plate.
- Take 3 pipe cleaners and glue the center of every underneath the guts as whiskers any glue will work, however scorching glue might be faster and safer.
- Glue 6 cotton balls over the whisker space you simply glued.
- Add two googly eyes.
- With a black marker draw bunny tooth and the highest of the bunny mouth.
- Connect the ears – we discovered that staples work the perfect are are the quickest.
MORE BUNNY FUN FROM KIDS ACTIVITIES BLOG

How did your paper plate Easter bunny craft prove?