Make your individual Mickey Mouse tie dye shirt! For those who love Disney or are going to go to a Disney park then you definitely’ll undoubtedly have to make these Mickey Mouse tie dye shirt. Children of all ages will love these shirts, however to make them this Mickey Mouse tie dye craft is finest for older children. This can be a enjoyable tie dye craft you are able to do at residence!
Mickey Mouse Tie Dye Shirt Craft
Planning a visit to a Disney Park? Make a set of those Mickey Head Tie Dye shirts to your complete group & stand out from the group! This enjoyable undertaking will make for some great pictures on the parks as nicely.
Associated: Try this easy and colorful sugar tie dye technique for t-shirts!
Now…onto the enjoyable half! Right here’s tips on how to make your tie dye shirts:
This submit accommodates affiliate hyperlinks.

Provides you will want To Make These Superior Mickey Mouse Tie Dye Shirts
Instructions To Tie Dye Mickey Mouse T-Shirts

Step 1
Hint your Mickey head sample on the tshirt with a pencil.
Step 2
Use a basting sew & sew round your traced Mickey head with the dental floss. A basting sew is simply up-down-up-down-up-down. Tremendous simple! Be sure you go away about 4″ of string hanging out whenever you start, as a result of you’ll pull the 2 ends collectively for the following step.
Step 3
Pull strings tight so Mickey is puckered & tie floss in a knot.
Step 4
Use rubber bands & band the world beneath Mickey’s head tightly. You need your rubber bands to create about an inch-long border.
Step 5
Soak shirt in Soda Ash for 20 minutes. Take away & wring out.
Step 6

Lay shirt flat on a desk with Mickey’s head pointing up.
Step 7

Utilizing your puckered Mickey head, seize about the place the rubber bands are & begin twisting. Preserve going till you find yourself with a “danish” roll form. It’s OK if it’s not good or if little components are protruding. Simply tuck them in…
Step 8
Utilizing 4 rubber bands, create pie sections in your tshirt danish. When it’s time to dye, you’ll alternate colours within the sections.

Step 9
Pull Mickey’s head up by way of the rubber bands within the center so his head is protruding above the danish.
Step 10
Lean your shirt over a sink, in order that Mickey’s head isn’t touching some other a part of the shirt.
Step 11
Saturate the pinnacle till it’s dripping, then cowl that half with plastic wrap. Chances are you’ll find yourself with a spot or two of dye on the shirt, however attempt to maintain Mickey’s Head coloration away from the remainder of the shirt.
Step 12

Dye the remainder of your shirt. Utilizing two or three complementary colours, dye alternating sections of your “danish pie”.
Tie Dye Tip
You need to over saturate your shirt. Dripping. Extra dye than you assume you probably want. You assume you’ve completed sufficient? Do some extra. Bury the nostril of your squirt bottle down into the creases & give an enormous squeeze. For those who don’t use sufficient dye, you should have numerous white in your shirt & your tie dye sample gained’t be as putting. The primary time I made ours, I assumed I used to be going to finish up with a giant blob of blurred colours as a result of “How might I probably want this a lot dye!”. Simply belief me. Go very heavy handed with the dye.
Step 13

Wrap the entire drippy factor in plastic wrap & let sit in a single day. Chuckle at your purple/blue/inexperienced/pink fingers.
Subsequent Day: Directions For Tie Dye Mickey Mouse Craft
Step 14

Unwrap your shirt ball & minimize off all the rubber bands. Rinse in chilly water till no extra dye comes out. This will likely take a short while!
Step 15
Snip the dental floss & pull out of the shirt.
Step 16
Run shirt by way of a chilly cycle within the washer.
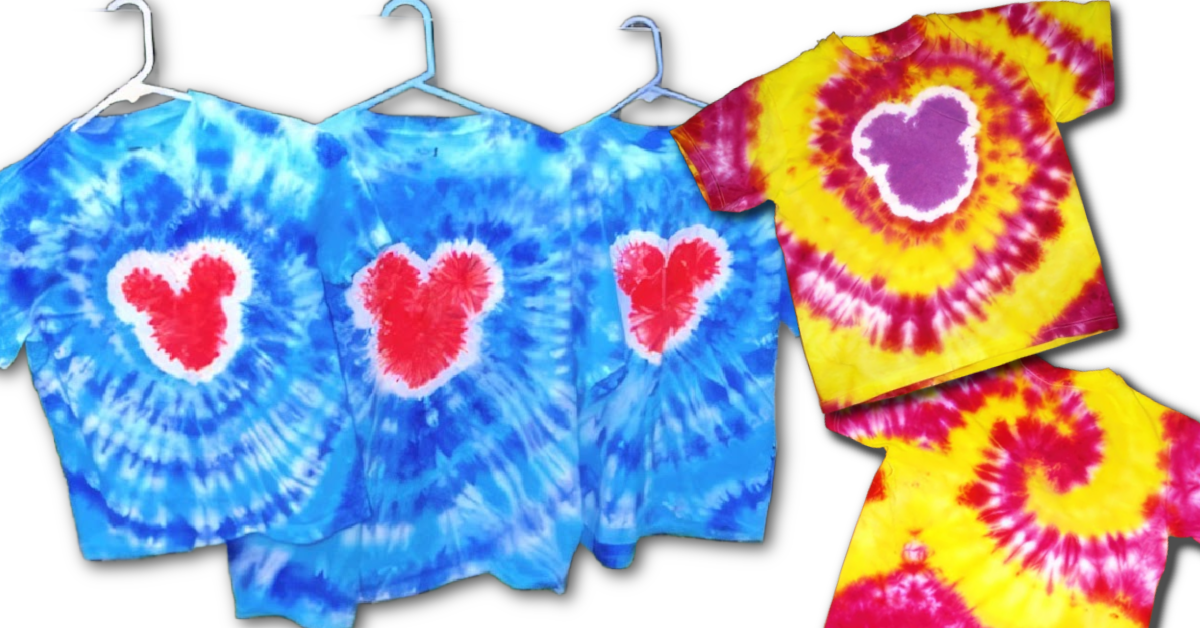
Last Outcomes- Examine Out Our Tie Dye Mickey Mouse Shirts!
Try the ultimate outcomes!

Right here’s the again:

I’ve additionally thought-about placing little rhinestones across the Mickey head for a woman’s shirt. I don’t assume my son would respect that although…
Some Nice Ideas For Making Your Mickey Mouse Tie Dye Shirt
A number of suggestions earlier than you start:
- Select t-shirts which are 100% cotton. Artificial mix shirts won’t maintain the colour nicely.
- Be sure you embody the Soda Ash step indicated beneath even when the model of dye you select doesn’t say to make use of it. The Soda Ash helps set the colours.
- You don’t need to lay our a fortune on dye. There are quite a few dye selections on-line & all of them proclaim to supply the most effective, skilled dye jobs. We’ve got at all times used Tulip model dye as a result of it’s what I might discover at Pastime Foyer. I used to be frightened that purchasing a “craft” model of dye would lead to much less daring colours, however as you possibly can see within the photograph above, that’s not the case!
- Ignore the variety of shirts your dye packet says it’s going to make. You will have extra dye for this undertaking. Assuming you’re utilizing two colours to your swirl, 1 bottle of every dye coloration will do about two grownup shirts, OR 3-4 kids’s shirts. For Mickey’s head, you’ll simply want 1 bottle of dye for your entire shirts because it’s such a small a part of the shirt.
- Don’t restrict your self to a white t-shirt as your start line! I noticed an lovely Mickey Head Tie Dye shirt that started off as a child blue t-shirt & they used a royal blue dye with a darkish pink Mickey head (head was a darkish shade of purple as a result of blue shirt + pink dye=purple!).
- Purchase somewhat extra dye than you assume you’ll want. The primary time I made a set of shirts, I ended up operating again to the craft retailer with purple fingers as a result of I ran out. You may at all times return any unused dye.
- VERY IMPORTANT: When selecting your coloration palate, consider the colour wheel & select accordingly! For those who select pink & inexperienced to your swirls, think about what mixing these colours will provide you with….BROWN. Anywhere they overlap, you’ll find yourself with muddy colours. I’d counsel sticking with colours combine nicely (yellow & pink, blue & pink, yellow & blue, and so on). For the shirts above, I used two shades of blue for the swirls (turquoise & royal blue) and fuchia for the pinnacle. Black dye doesn’t produce a robust black coloration & I’d counsel staying away from it.
Supplies
- 1 t-shirt per individual (100% cotton)
- bag of rubber bands
- waxed plain dental floss & needle
- tie dye combine
- Soda Ash (discovered with tie dye provides)
- plastic wrap
- squirt bottles (most dye kits include these already)
Directions
- Hint your Mickey head sample on the tshirt with a pencil.
- Use a basting sew & sew round your traced Mickey head with the dental floss. A basting sew is simply up-down-up-down-up-down. Tremendous simple! Be sure you go away about 4″ of string hanging out whenever you start, as a result of you’ll pull the 2 ends collectively for the following step.
- Pull strings tight so Mickey is puckered & tie floss in a knot.
- Use rubber bands & band the world beneath Mickey’s head tightly. You need your rubber bands to create about an inch-long border.
- Soak shirt in Soda Ash for 20 minutes. Take away & wring out.
- Lay shirt flat on a desk with Mickey’s head pointing up.
- Utilizing your puckered Mickey head, seize about the place the rubber bands are & begin twisting. Preserve going till you find yourself with a “danish” roll form. It’s OK if it’s not good or if little components are protruding. Simply tuck them in…
- Utilizing 4 rubber bands, create pie sections in your tshirt danish. When it’s time to dye, you’ll alternate colours within the sections.
- Pull Mickey’s head up by way of the rubber bands within the center so his head is protruding above the danish.
- Lean your shirt over a sink, in order that Mickey’s head isn’t touching some other a part of the shirt.
- Saturate the pinnacle till it’s dripping, then cowl that half with plastic wrap. Chances are you’ll find yourself with a spot or two of dye on the shirt, however attempt to maintain Mickey’s Head coloration away from the remainder of the shirt.
- Dye the remainder of your shirt. Utilizing two or three complementary colours, dye alternating sections of your “danish pie”.
- Wrap the entire drippy factor in plastic wrap & let sit in a single day. Chuckle at your purple/blue/inexperienced/pink fingers.
- Unwrap your shirt ball & minimize off all the rubber bands.
- Rinse in chilly water till no extra dye comes out. This will likely take a short while!
- Snip the dental floss & pull out of the shirt.
- Run shirt by way of a chilly cycle within the washer.
Extra Tie Dye Crafts From Children Actions Weblog
Tell us if you happen to make a Mickey Head Tie Dye shirt! Consider different shapes you would use as nicely. My subsequent undertaking will probably be utilizing a cross!