Do you have got a younger canine lover at house? Do they like attempting out origami fashions? Then you definitely’ve obtained to do this greenback invoice origami canine! This origami tutorial is nice for adults and older youngsters with expertise within the artwork of origami. With straightforward directions and a crisp greenback invoice, you’ll have a pleasant origami canine very quickly.
Greenback Invoice Origami Canine Directions
Step 1:
Fold the highest left nook of the greenback invoice down to satisfy the underside edge.
![Dollar bill origami doll - step 1 - crisp dollar bill on top of table](https://kidsactivitiesblog.com/wp-content/uploads/2023/12/Dollar-Bill-Origami-Dog-1.jpg 710w, https://kidsactivitiesblog.com/wp-content/uploads/2023/12/Dollar-Bill-Origami-Dog-1-610x404.jpg 610w, https://kidsactivitiesblog.com/wp-content/uploads/2023/12/Dollar-Bill-Origami-Dog-1-400x265.jpg 400w, https://kidsactivitiesblog.com/wp-content/uploads/2023/12/Dollar-Bill-Origami-Dog-1-150x99.jpg 150w)
![Dollar bill origami doll - step 1 - Fold the top left corner of the dollar bill down to meet the bottom edge.](https://kidsactivitiesblog.com/wp-content/uploads/2023/12/Dollar-Bill-Origami-Dog-2.jpg 710w, https://kidsactivitiesblog.com/wp-content/uploads/2023/12/Dollar-Bill-Origami-Dog-2-610x404.jpg 610w, https://kidsactivitiesblog.com/wp-content/uploads/2023/12/Dollar-Bill-Origami-Dog-2-400x265.jpg 400w, https://kidsactivitiesblog.com/wp-content/uploads/2023/12/Dollar-Bill-Origami-Dog-2-150x99.jpg 150w)
Let’s begin with a easy fold.
Step 2:
Fold the invoice’s proper facet inward alongside the sting created within the earlier step.
![Dollar bill origami dog - step 2 - Fold the bill's right side inward along the edge created in the previous step.](https://kidsactivitiesblog.com/wp-content/uploads/2023/12/Dollar-Bill-Origami-Dog-3.jpg 710w, https://kidsactivitiesblog.com/wp-content/uploads/2023/12/Dollar-Bill-Origami-Dog-3-610x404.jpg 610w, https://kidsactivitiesblog.com/wp-content/uploads/2023/12/Dollar-Bill-Origami-Dog-3-400x265.jpg 400w, https://kidsactivitiesblog.com/wp-content/uploads/2023/12/Dollar-Bill-Origami-Dog-3-150x99.jpg 150w)
Step 3:
Now, fold the suitable edge ahead on the tip of the earlier fold, making certain a crisp crease.
![Dollar bill origami dog - step 3 - Now, fold the right edge forward at the tip of the previous fold, ensuring a crisp crease.](https://kidsactivitiesblog.com/wp-content/uploads/2023/12/Dollar-Bill-Origami-Dog-4.jpg 710w, https://kidsactivitiesblog.com/wp-content/uploads/2023/12/Dollar-Bill-Origami-Dog-4-610x404.jpg 610w, https://kidsactivitiesblog.com/wp-content/uploads/2023/12/Dollar-Bill-Origami-Dog-4-400x265.jpg 400w, https://kidsactivitiesblog.com/wp-content/uploads/2023/12/Dollar-Bill-Origami-Dog-4-150x99.jpg 150w)
Step 4:
Gently unfold the invoice, then fold the suitable edge exactly alongside the crease made within the earlier step.
![Dollar bill origami dog - step 4 - unfold](https://kidsactivitiesblog.com/wp-content/uploads/2023/12/Dollar-Bill-Origami-Dog-5.jpg 710w, https://kidsactivitiesblog.com/wp-content/uploads/2023/12/Dollar-Bill-Origami-Dog-5-610x404.jpg 610w, https://kidsactivitiesblog.com/wp-content/uploads/2023/12/Dollar-Bill-Origami-Dog-5-400x265.jpg 400w, https://kidsactivitiesblog.com/wp-content/uploads/2023/12/Dollar-Bill-Origami-Dog-5-150x99.jpg 150w)
![Dollar bill origami dog - step 4 - fold the right edge precisely along the crease made in the previous step.](https://kidsactivitiesblog.com/wp-content/uploads/2023/12/Dollar-Bill-Origami-Dog-6.jpg 710w, https://kidsactivitiesblog.com/wp-content/uploads/2023/12/Dollar-Bill-Origami-Dog-6-610x404.jpg 610w, https://kidsactivitiesblog.com/wp-content/uploads/2023/12/Dollar-Bill-Origami-Dog-6-400x265.jpg 400w, https://kidsactivitiesblog.com/wp-content/uploads/2023/12/Dollar-Bill-Origami-Dog-6-150x99.jpg 150w)
Step 5:
Fold the determine in half alongside the middle, making certain a neat crease.
![Dollar bill origami dog - step 5 - Fold the figure in half along the center, ensuring a neat crease.](https://kidsactivitiesblog.com/wp-content/uploads/2023/12/Dollar-Bill-Origami-Dog-7.jpg 710w, https://kidsactivitiesblog.com/wp-content/uploads/2023/12/Dollar-Bill-Origami-Dog-7-610x404.jpg 610w, https://kidsactivitiesblog.com/wp-content/uploads/2023/12/Dollar-Bill-Origami-Dog-7-400x265.jpg 400w, https://kidsactivitiesblog.com/wp-content/uploads/2023/12/Dollar-Bill-Origami-Dog-7-150x99.jpg 150w)
Step 6:
Create guiding creases by folding the determine in half lengthwise and crosswise, then unfold.
![Dollar bill origami dog - step 6 - Create guiding creases by folding the figure in half lengthwise](https://kidsactivitiesblog.com/wp-content/uploads/2023/12/Dollar-Bill-Origami-Dog-8.jpg 710w, https://kidsactivitiesblog.com/wp-content/uploads/2023/12/Dollar-Bill-Origami-Dog-8-610x404.jpg 610w, https://kidsactivitiesblog.com/wp-content/uploads/2023/12/Dollar-Bill-Origami-Dog-8-400x265.jpg 400w, https://kidsactivitiesblog.com/wp-content/uploads/2023/12/Dollar-Bill-Origami-Dog-8-150x99.jpg 150w)
![Dollar bill origami dog - step 6 - Create guiding creases by folding the figure in half crosswise](https://kidsactivitiesblog.com/wp-content/uploads/2023/12/Dollar-Bill-Origami-Dog-10.jpg 710w, https://kidsactivitiesblog.com/wp-content/uploads/2023/12/Dollar-Bill-Origami-Dog-10-610x404.jpg 610w, https://kidsactivitiesblog.com/wp-content/uploads/2023/12/Dollar-Bill-Origami-Dog-10-400x265.jpg 400w, https://kidsactivitiesblog.com/wp-content/uploads/2023/12/Dollar-Bill-Origami-Dog-10-150x99.jpg 150w)
![Dollar bill origami dog - step 6 - unfold](https://kidsactivitiesblog.com/wp-content/uploads/2023/12/Dollar-Bill-Origami-Dog-9.jpg 710w, https://kidsactivitiesblog.com/wp-content/uploads/2023/12/Dollar-Bill-Origami-Dog-9-610x404.jpg 610w, https://kidsactivitiesblog.com/wp-content/uploads/2023/12/Dollar-Bill-Origami-Dog-9-400x265.jpg 400w, https://kidsactivitiesblog.com/wp-content/uploads/2023/12/Dollar-Bill-Origami-Dog-9-150x99.jpg 150w)
Step 7:
Use these guiding creases to fold the highest left and backside proper corners as indicated within the picture step directions.
![Dollar bill origami dog - Step 7: Use these guiding creases to fold the top left and bottom right corners](https://kidsactivitiesblog.com/wp-content/uploads/2023/12/Dollar-Bill-Origami-Dog-14.jpg 710w, https://kidsactivitiesblog.com/wp-content/uploads/2023/12/Dollar-Bill-Origami-Dog-14-610x404.jpg 610w, https://kidsactivitiesblog.com/wp-content/uploads/2023/12/Dollar-Bill-Origami-Dog-14-400x265.jpg 400w, https://kidsactivitiesblog.com/wp-content/uploads/2023/12/Dollar-Bill-Origami-Dog-14-150x99.jpg 150w)
Step 8:
Fold the higher left nook’s tip beneath itself, and fold the underside proper nook’s tip downwards.
![Dollar bill origami dog - Step 8: Fold the upper left corner's tip underneath itself](https://kidsactivitiesblog.com/wp-content/uploads/2023/12/Dollar-Bill-Origami-Dog-15.jpg 710w, https://kidsactivitiesblog.com/wp-content/uploads/2023/12/Dollar-Bill-Origami-Dog-15-610x404.jpg 610w, https://kidsactivitiesblog.com/wp-content/uploads/2023/12/Dollar-Bill-Origami-Dog-15-400x265.jpg 400w, https://kidsactivitiesblog.com/wp-content/uploads/2023/12/Dollar-Bill-Origami-Dog-15-150x99.jpg 150w)
![Dollar bill origami dog - step 8 - fold the bottom right corner's tip downwards.](https://kidsactivitiesblog.com/wp-content/uploads/2023/12/Dollar-Bill-Origami-Dog-16.jpg 710w, https://kidsactivitiesblog.com/wp-content/uploads/2023/12/Dollar-Bill-Origami-Dog-16-610x404.jpg 610w, https://kidsactivitiesblog.com/wp-content/uploads/2023/12/Dollar-Bill-Origami-Dog-16-400x265.jpg 400w, https://kidsactivitiesblog.com/wp-content/uploads/2023/12/Dollar-Bill-Origami-Dog-16-150x99.jpg 150w)
Step 9:
Fold the determine in half alongside the prevailing crease, sustaining alignment.
![Dollar bill origami dog - Step 9: Fold the figure in half along the existing crease, maintaining alignment.](https://kidsactivitiesblog.com/wp-content/uploads/2023/12/Dollar-Bill-Origami-Dog-17.jpg 710w, https://kidsactivitiesblog.com/wp-content/uploads/2023/12/Dollar-Bill-Origami-Dog-17-610x404.jpg 610w, https://kidsactivitiesblog.com/wp-content/uploads/2023/12/Dollar-Bill-Origami-Dog-17-400x265.jpg 400w, https://kidsactivitiesblog.com/wp-content/uploads/2023/12/Dollar-Bill-Origami-Dog-17-150x99.jpg 150w)
Step 10:
Carry and fold the underside of the highest layer up.
![Dollar bill origami dog - Lift and fold the bottom of the top layer up.](https://kidsactivitiesblog.com/wp-content/uploads/2023/12/Dollar-Bill-Origami-Dog-18.jpg 710w, https://kidsactivitiesblog.com/wp-content/uploads/2023/12/Dollar-Bill-Origami-Dog-18-610x404.jpg 610w, https://kidsactivitiesblog.com/wp-content/uploads/2023/12/Dollar-Bill-Origami-Dog-18-400x265.jpg 400w, https://kidsactivitiesblog.com/wp-content/uploads/2023/12/Dollar-Bill-Origami-Dog-18-150x99.jpg 150w)
Step 11:
Fold it again as proven. Repeat the earlier step for the opposite facet of the invoice to create symmetrical folds.
![Dollar bill origami dog - Step 11: Repeat the previous step for the other side of the bill to create symmetrical folds.](https://kidsactivitiesblog.com/wp-content/uploads/2023/12/Dollar-Bill-Origami-Dog-21.jpg 710w, https://kidsactivitiesblog.com/wp-content/uploads/2023/12/Dollar-Bill-Origami-Dog-21-610x404.jpg 610w, https://kidsactivitiesblog.com/wp-content/uploads/2023/12/Dollar-Bill-Origami-Dog-21-400x265.jpg 400w, https://kidsactivitiesblog.com/wp-content/uploads/2023/12/Dollar-Bill-Origami-Dog-21-150x99.jpg 150w)
![Dollar bill origami dog - Step 11: Repeat the previous step for the other side of the bill to create symmetrical folds.](https://kidsactivitiesblog.com/wp-content/uploads/2023/12/Dollar-Bill-Origami-Dog-23.jpg 710w, https://kidsactivitiesblog.com/wp-content/uploads/2023/12/Dollar-Bill-Origami-Dog-23-610x404.jpg 610w, https://kidsactivitiesblog.com/wp-content/uploads/2023/12/Dollar-Bill-Origami-Dog-23-400x265.jpg 400w, https://kidsactivitiesblog.com/wp-content/uploads/2023/12/Dollar-Bill-Origami-Dog-23-150x99.jpg 150w)
Step 12:
With precision, pull the flap between each layers and flatten as proven in photographs.
![Dollar bill origami dog - Step 12: With precision, pull the flap between both layers and flatten as shown in photos.](https://kidsactivitiesblog.com/wp-content/uploads/2023/12/Dollar-Bill-Origami-Dog-24.jpg 710w, https://kidsactivitiesblog.com/wp-content/uploads/2023/12/Dollar-Bill-Origami-Dog-24-610x404.jpg 610w, https://kidsactivitiesblog.com/wp-content/uploads/2023/12/Dollar-Bill-Origami-Dog-24-400x265.jpg 400w, https://kidsactivitiesblog.com/wp-content/uploads/2023/12/Dollar-Bill-Origami-Dog-24-150x99.jpg 150w)
![Dollar bill origami dog - Step 12: With precision, pull the flap between both layers and flatten as shown in photos.](https://kidsactivitiesblog.com/wp-content/uploads/2023/12/Dollar-Bill-Origami-Dog-25.jpg 710w, https://kidsactivitiesblog.com/wp-content/uploads/2023/12/Dollar-Bill-Origami-Dog-25-610x404.jpg 610w, https://kidsactivitiesblog.com/wp-content/uploads/2023/12/Dollar-Bill-Origami-Dog-25-400x265.jpg 400w, https://kidsactivitiesblog.com/wp-content/uploads/2023/12/Dollar-Bill-Origami-Dog-25-150x99.jpg 150w)
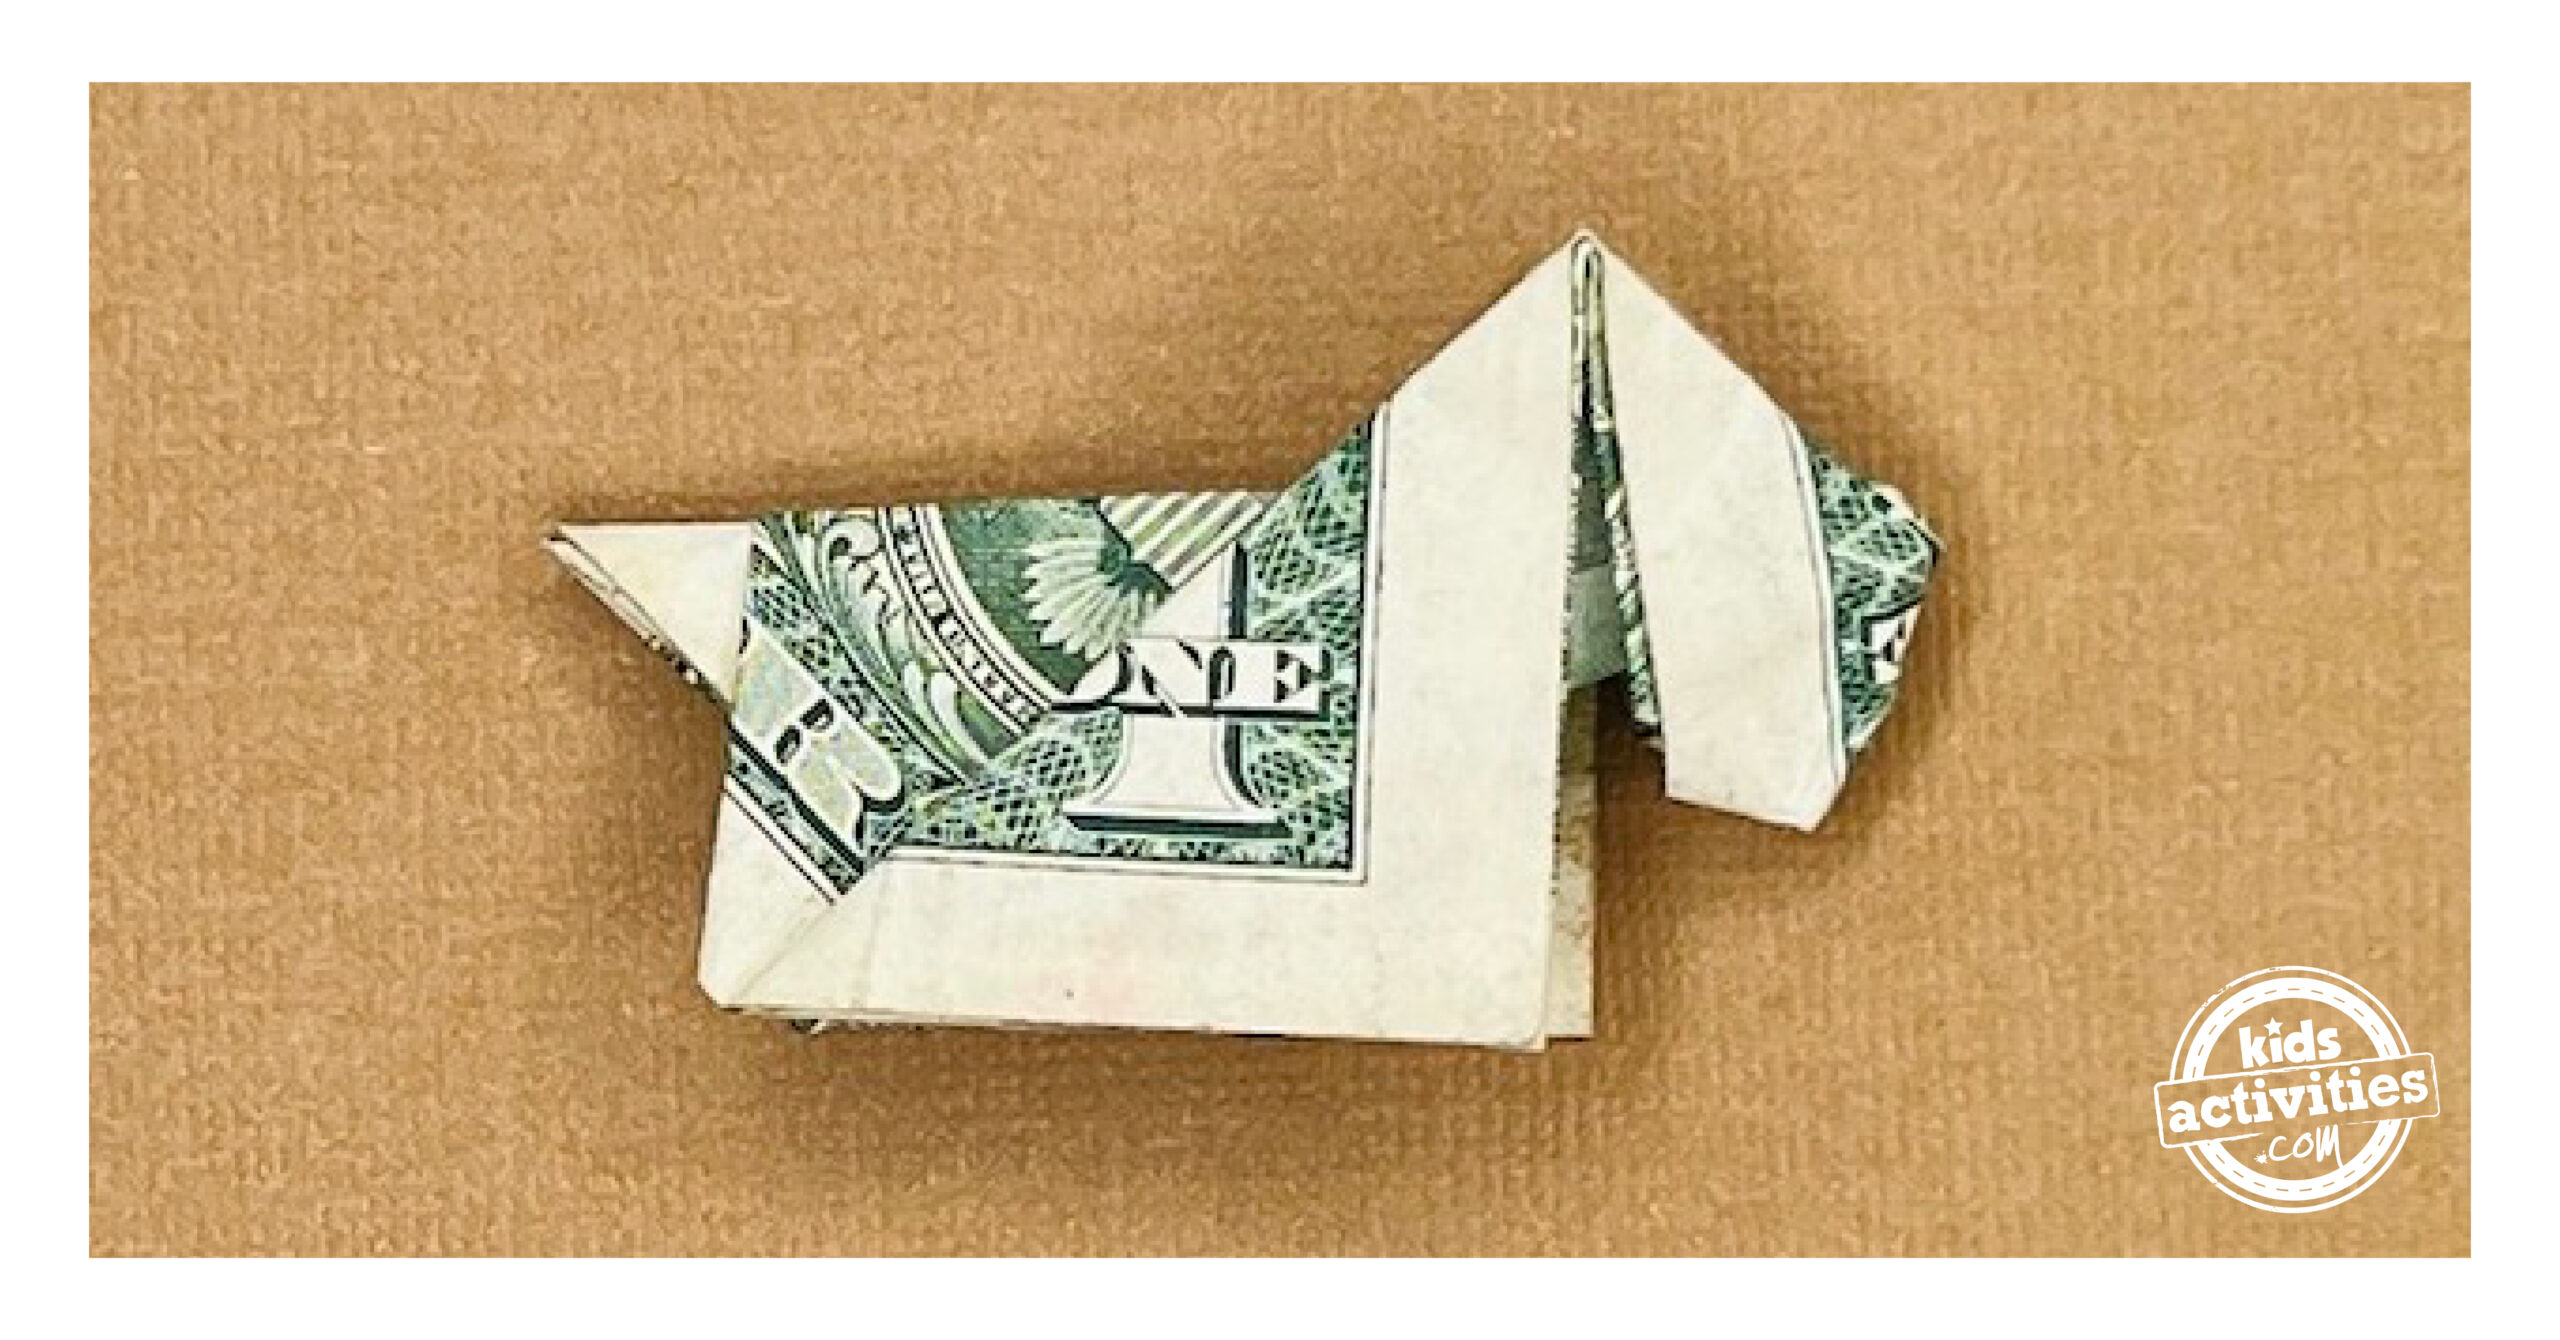
That is the final step – now you have got a greenback invoice origami canine!
MORE EASY TUTORIALS FROM KIDS ACTIVITIES BLOG:
Did you take pleasure in making this enjoyable greenback invoice origami canine?