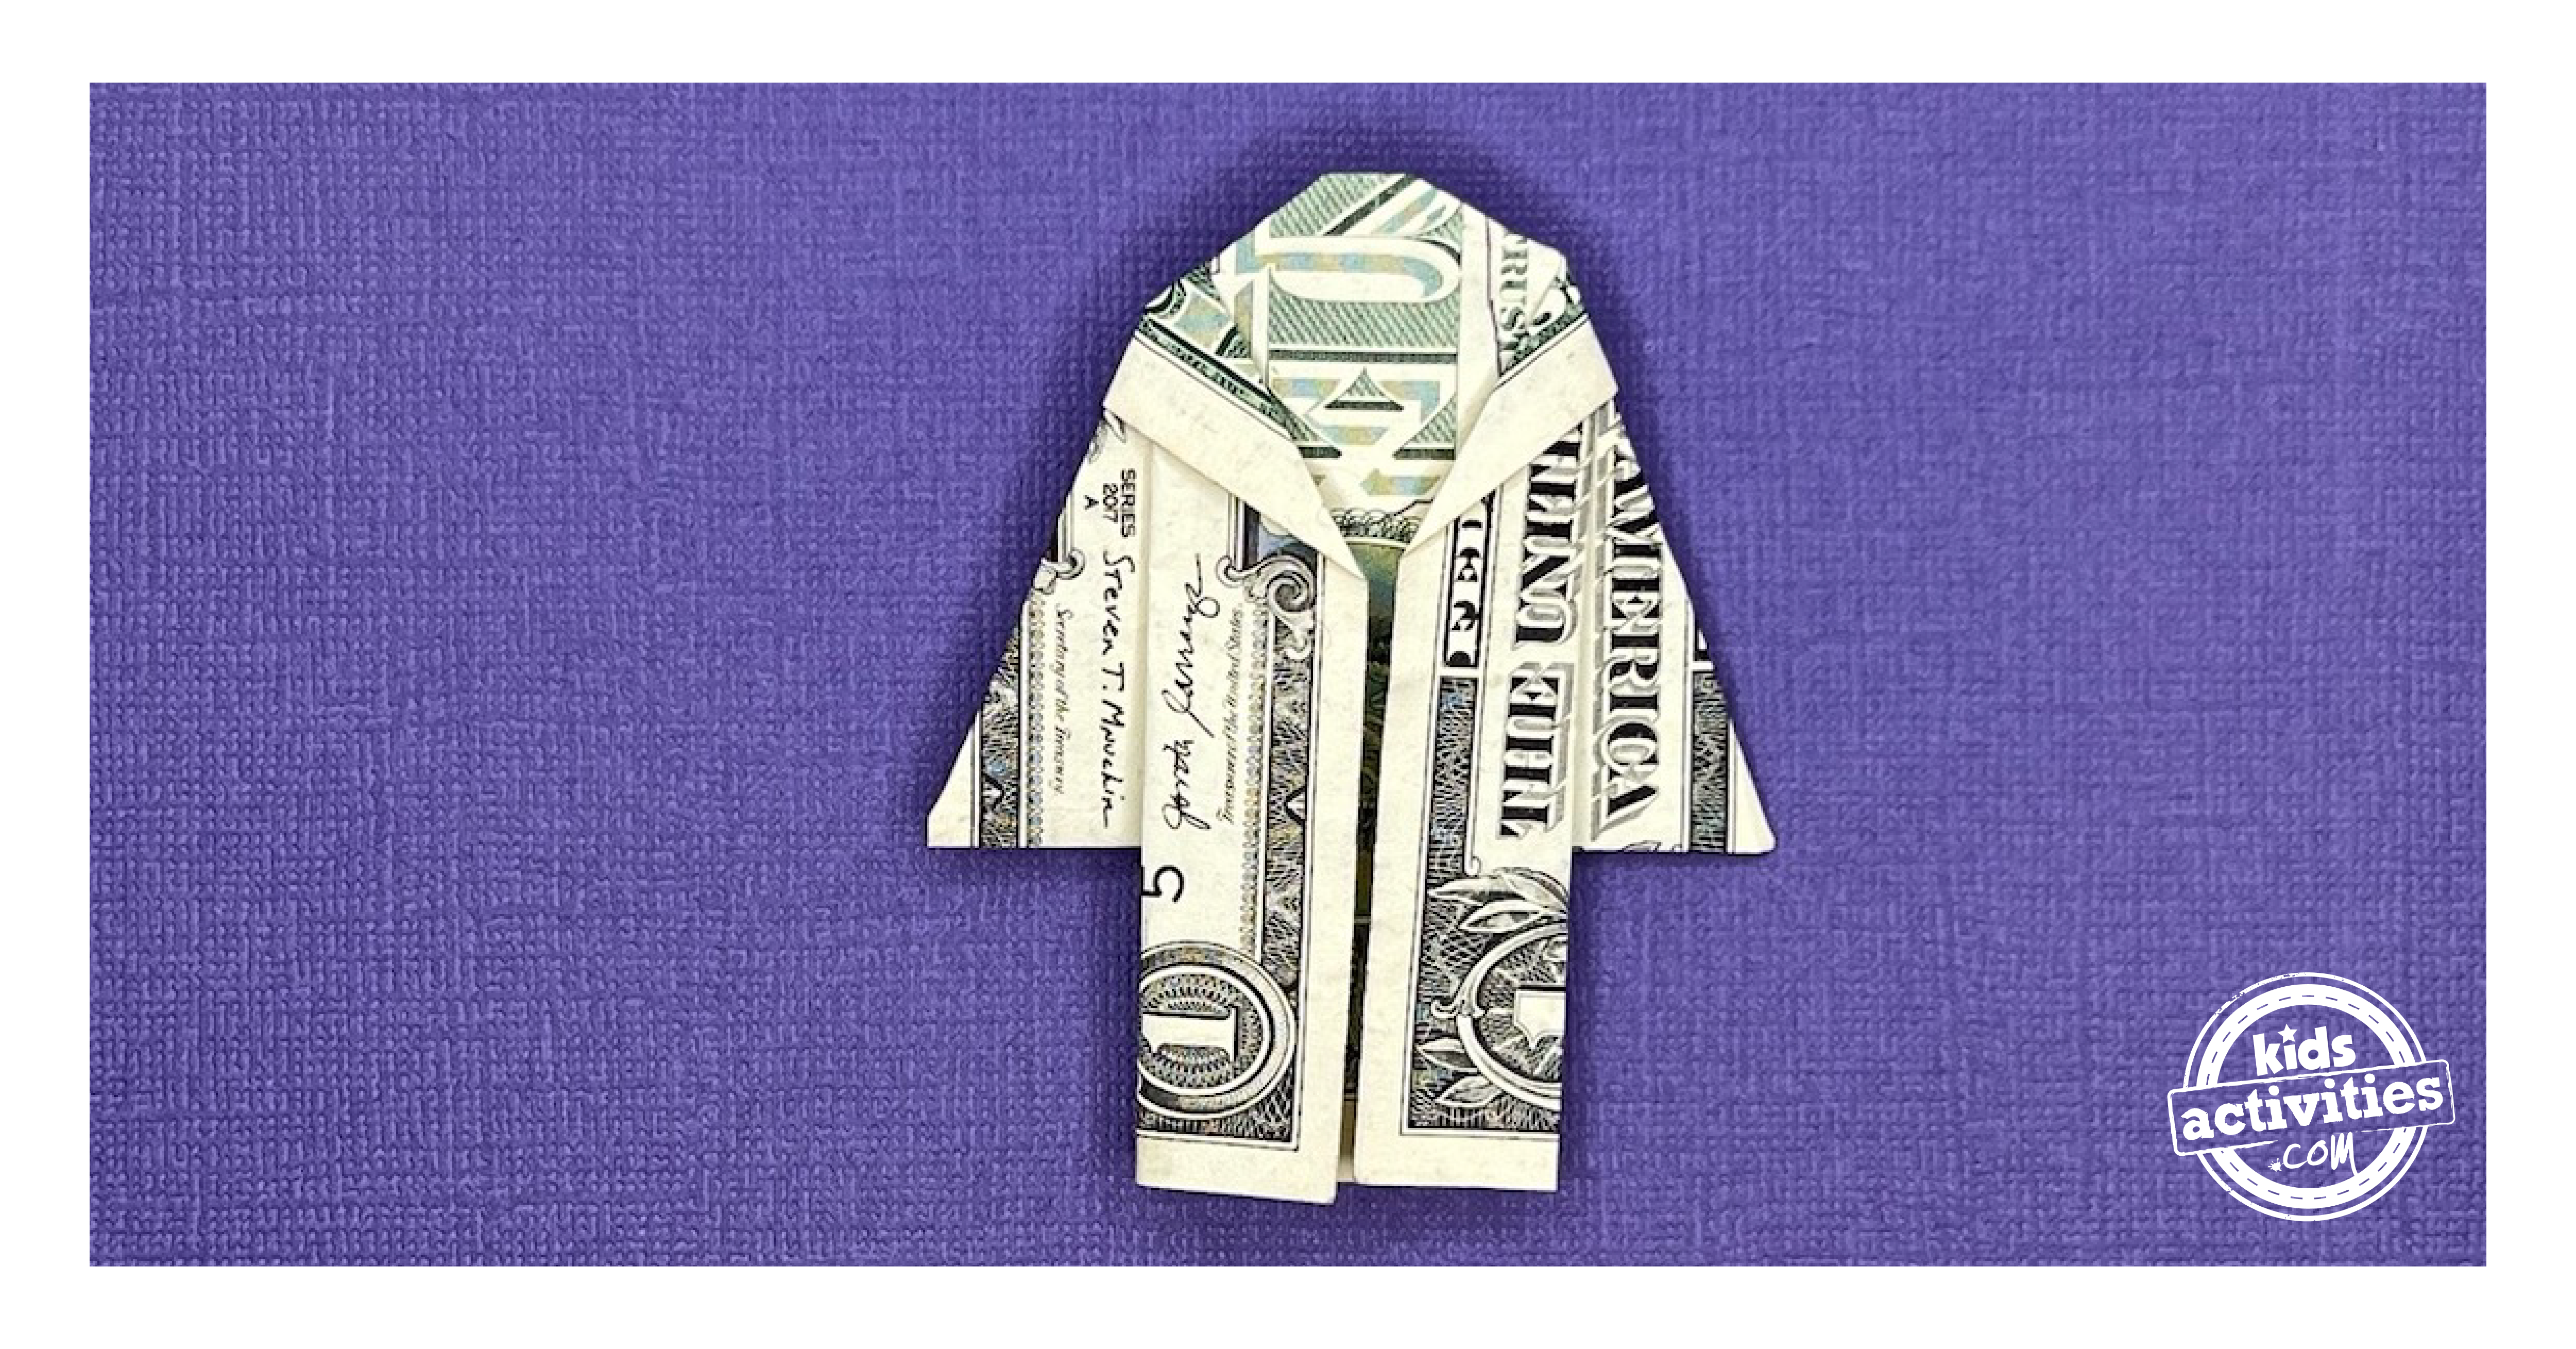
Are you in search of enjoyable methods to offer cash? Give greenback invoice origami a strive! This cash origami gown is one among my prime picks once I wish to give a particular present.
Observe our step-by-step directions (accompanied by a great deal of photographs), get a US greenback invoice – a contemporary greenback invoice is greatest –, and prepare to make a enjoyable greenback origami gown!
Try this dollar origami shirt for more variety.
Directions to make a greenback invoice origami gown:
Step 1:
Start with a contemporary, crisp invoice. Fold it crosswise after which unfold to ascertain a clear crease.
![Dollar bill origami dress - step 1 - start with a crisp bill. tutorial from kids activities blog](https://kidsactivitiesblog.com/wp-content/uploads/2023/12/Dollar-Bill-Origami-Dress-1.jpg 710w, https://kidsactivitiesblog.com/wp-content/uploads/2023/12/Dollar-Bill-Origami-Dress-1-610x404.jpg 610w, https://kidsactivitiesblog.com/wp-content/uploads/2023/12/Dollar-Bill-Origami-Dress-1-400x265.jpg 400w, https://kidsactivitiesblog.com/wp-content/uploads/2023/12/Dollar-Bill-Origami-Dress-1-150x99.jpg 150w)
![Dollar bill origami dress - Step 1 - then unfold to create a clean crease.](https://kidsactivitiesblog.com/wp-content/uploads/2023/12/Dollar-Bill-Origami-Dress-2.jpg 710w, https://kidsactivitiesblog.com/wp-content/uploads/2023/12/Dollar-Bill-Origami-Dress-2-610x404.jpg 610w, https://kidsactivitiesblog.com/wp-content/uploads/2023/12/Dollar-Bill-Origami-Dress-2-400x265.jpg 400w, https://kidsactivitiesblog.com/wp-content/uploads/2023/12/Dollar-Bill-Origami-Dress-2-150x99.jpg 150w)
![Dollar bill origami dress - Step 1 - now unfold for neat folds.](https://kidsactivitiesblog.com/wp-content/uploads/2023/12/Dollar-Bill-Origami-Dress-3.jpg 710w, https://kidsactivitiesblog.com/wp-content/uploads/2023/12/Dollar-Bill-Origami-Dress-3-610x404.jpg 610w, https://kidsactivitiesblog.com/wp-content/uploads/2023/12/Dollar-Bill-Origami-Dress-3-400x265.jpg 400w, https://kidsactivitiesblog.com/wp-content/uploads/2023/12/Dollar-Bill-Origami-Dress-3-150x99.jpg 150w)
Step 2:
Fold the highest and backside edges in direction of the crease, then unfold for neat folds.
![Dollar bill origami dress - Step 2 - Fold the top and bottom edges towards the crease, then unfold for neat folds.](https://kidsactivitiesblog.com/wp-content/uploads/2023/12/Dollar-Bill-Origami-Dress-4.jpg 710w, https://kidsactivitiesblog.com/wp-content/uploads/2023/12/Dollar-Bill-Origami-Dress-4-610x404.jpg 610w, https://kidsactivitiesblog.com/wp-content/uploads/2023/12/Dollar-Bill-Origami-Dress-4-400x265.jpg 400w, https://kidsactivitiesblog.com/wp-content/uploads/2023/12/Dollar-Bill-Origami-Dress-4-150x99.jpg 150w)
![Dollar bill origami dress - Step 2 - Fold the top and bottom edges towards the crease, then unfold for neat folds.](https://kidsactivitiesblog.com/wp-content/uploads/2023/12/Dollar-Bill-Origami-Dress-5.jpg 710w, https://kidsactivitiesblog.com/wp-content/uploads/2023/12/Dollar-Bill-Origami-Dress-5-610x404.jpg 610w, https://kidsactivitiesblog.com/wp-content/uploads/2023/12/Dollar-Bill-Origami-Dress-5-400x265.jpg 400w, https://kidsactivitiesblog.com/wp-content/uploads/2023/12/Dollar-Bill-Origami-Dress-5-150x99.jpg 150w)
Step 3:
Fold the invoice in half lengthwise to create the central line for the gown.
![Dollar bill origami dress - Step 3 - Fold the bill in half lengthwise to create the central line for the dress.](https://kidsactivitiesblog.com/wp-content/uploads/2023/12/Dollar-Bill-Origami-Dress-6.jpg 710w, https://kidsactivitiesblog.com/wp-content/uploads/2023/12/Dollar-Bill-Origami-Dress-6-610x404.jpg 610w, https://kidsactivitiesblog.com/wp-content/uploads/2023/12/Dollar-Bill-Origami-Dress-6-400x265.jpg 400w, https://kidsactivitiesblog.com/wp-content/uploads/2023/12/Dollar-Bill-Origami-Dress-6-150x99.jpg 150w)
Step 4:
Rigorously fold the highest left nook to create a transparent crease, then unfold for the subsequent steps.
![Dollar bill origami dress - Step 4 - Carefully fold the top left corner to create a clear crease.](https://kidsactivitiesblog.com/wp-content/uploads/2023/12/Dollar-Bill-Origami-Dress-7.jpg 710w, https://kidsactivitiesblog.com/wp-content/uploads/2023/12/Dollar-Bill-Origami-Dress-7-610x404.jpg 610w, https://kidsactivitiesblog.com/wp-content/uploads/2023/12/Dollar-Bill-Origami-Dress-7-400x265.jpg 400w, https://kidsactivitiesblog.com/wp-content/uploads/2023/12/Dollar-Bill-Origami-Dress-7-150x99.jpg 150w)
![Dollar bill origami dress - Step 4 - then unfold for the next steps.](https://kidsactivitiesblog.com/wp-content/uploads/2023/12/Dollar-Bill-Origami-Dress-8.jpg 710w, https://kidsactivitiesblog.com/wp-content/uploads/2023/12/Dollar-Bill-Origami-Dress-8-610x404.jpg 610w, https://kidsactivitiesblog.com/wp-content/uploads/2023/12/Dollar-Bill-Origami-Dress-8-400x265.jpg 400w, https://kidsactivitiesblog.com/wp-content/uploads/2023/12/Dollar-Bill-Origami-Dress-8-150x99.jpg 150w)
Step 5:
Rotate the invoice till the fold sits on the prime, with the free edges on the backside. Fold the proper aspect fringe of the highest layer alongside the marked creases and press it flat.
![Dollar bill origami dress - Step 5 - Rotate the bill until the fold sits at the top, with the free edges at the bottom. Fold the right side edge of the top layer along the marked creases and press it flat.](https://kidsactivitiesblog.com/wp-content/uploads/2023/12/Dollar-Bill-Origami-Dress-9.jpg 710w, https://kidsactivitiesblog.com/wp-content/uploads/2023/12/Dollar-Bill-Origami-Dress-9-610x404.jpg 610w, https://kidsactivitiesblog.com/wp-content/uploads/2023/12/Dollar-Bill-Origami-Dress-9-400x265.jpg 400w, https://kidsactivitiesblog.com/wp-content/uploads/2023/12/Dollar-Bill-Origami-Dress-9-150x99.jpg 150w)
Step 6:
Repeat the identical fold for the left aspect, then flip the invoice over for the subsequent steps.
![Dollar bill origami dress - Step 6 - Repeat the same fold for the left side, then flip the bill over for the next steps.](https://kidsactivitiesblog.com/wp-content/uploads/2023/12/Dollar-Bill-Origami-Dress-10.jpg 710w, https://kidsactivitiesblog.com/wp-content/uploads/2023/12/Dollar-Bill-Origami-Dress-10-610x404.jpg 610w, https://kidsactivitiesblog.com/wp-content/uploads/2023/12/Dollar-Bill-Origami-Dress-10-400x265.jpg 400w, https://kidsactivitiesblog.com/wp-content/uploads/2023/12/Dollar-Bill-Origami-Dress-10-150x99.jpg 150w)
![Dollar bill origami dress - Step 7 - then flip the bill over for the next steps.](https://kidsactivitiesblog.com/wp-content/uploads/2023/12/Dollar-Bill-Origami-Dress-11.jpg 710w, https://kidsactivitiesblog.com/wp-content/uploads/2023/12/Dollar-Bill-Origami-Dress-11-610x404.jpg 610w, https://kidsactivitiesblog.com/wp-content/uploads/2023/12/Dollar-Bill-Origami-Dress-11-400x265.jpg 400w, https://kidsactivitiesblog.com/wp-content/uploads/2023/12/Dollar-Bill-Origami-Dress-11-150x99.jpg 150w)
Step 7:
Fold up the backside edge of the highest layer to find out the size of your gown.
![Dollar bill origami dress - Step 8 - Fold up the bottom edge of the top layer to determine the length of your dress.](https://kidsactivitiesblog.com/wp-content/uploads/2023/12/Dollar-Bill-Origami-Dress-12.jpg 710w, https://kidsactivitiesblog.com/wp-content/uploads/2023/12/Dollar-Bill-Origami-Dress-12-610x404.jpg 610w, https://kidsactivitiesblog.com/wp-content/uploads/2023/12/Dollar-Bill-Origami-Dress-12-400x265.jpg 400w, https://kidsactivitiesblog.com/wp-content/uploads/2023/12/Dollar-Bill-Origami-Dress-12-150x99.jpg 150w)
Step 8:
Craft the highest a part of the gown by folding the highest corners down as demonstrated.
![Dollar bill origami dress - Step 8 - Craft the top part of the dress by folding the top corners down as demonstrated](https://kidsactivitiesblog.com/wp-content/uploads/2023/12/Dollar-Bill-Origami-Dress-14.jpg 710w, https://kidsactivitiesblog.com/wp-content/uploads/2023/12/Dollar-Bill-Origami-Dress-14-610x404.jpg 610w, https://kidsactivitiesblog.com/wp-content/uploads/2023/12/Dollar-Bill-Origami-Dress-14-400x265.jpg 400w, https://kidsactivitiesblog.com/wp-content/uploads/2023/12/Dollar-Bill-Origami-Dress-14-150x99.jpg 150w)
Step 9:
Good the gown’s look by folding the information down once more.
![Dollar bill origami dress - Step 10 - Perfect the dress's appearance by folding the tips down again](https://kidsactivitiesblog.com/wp-content/uploads/2023/12/Dollar-Bill-Origami-Dress-16.jpg 710w, https://kidsactivitiesblog.com/wp-content/uploads/2023/12/Dollar-Bill-Origami-Dress-16-610x404.jpg 610w, https://kidsactivitiesblog.com/wp-content/uploads/2023/12/Dollar-Bill-Origami-Dress-16-400x265.jpg 400w, https://kidsactivitiesblog.com/wp-content/uploads/2023/12/Dollar-Bill-Origami-Dress-16-150x99.jpg 150w)
Step 10:
Flip the invoice over to finish your trendy craft.
![Dollar bill origami dress - Step 11 - Flip the bill over to complete the base of your stylish dress.](https://kidsactivitiesblog.com/wp-content/uploads/2023/12/Dollar-Bill-Origami-Dress-16-1.jpg 710w, https://kidsactivitiesblog.com/wp-content/uploads/2023/12/Dollar-Bill-Origami-Dress-16-1-610x404.jpg 610w, https://kidsactivitiesblog.com/wp-content/uploads/2023/12/Dollar-Bill-Origami-Dress-16-1-400x265.jpg 400w, https://kidsactivitiesblog.com/wp-content/uploads/2023/12/Dollar-Bill-Origami-Dress-16-1-150x99.jpg 150w)
Step 11:
Ta-da! Your origami gown is now prepared for any big day.
![Dollar bill origami dress - Step 11 - Ta-da! Your origami dress is now ready for any special occasion.](https://kidsactivitiesblog.com/wp-content/uploads/2023/12/Dollar-Bill-Origami-Dress-17.jpg 710w, https://kidsactivitiesblog.com/wp-content/uploads/2023/12/Dollar-Bill-Origami-Dress-17-610x404.jpg 610w, https://kidsactivitiesblog.com/wp-content/uploads/2023/12/Dollar-Bill-Origami-Dress-17-400x265.jpg 400w, https://kidsactivitiesblog.com/wp-content/uploads/2023/12/Dollar-Bill-Origami-Dress-17-150x99.jpg 150w)
Energetic Time
8 minutes
Complete Time
8 minutes
Problem
straightforward
Estimated Price
$1
Notes
Ideas:
- You should utilize faux cash for youthful youngsters susceptible to dropping their items.
- If youthful youngsters are attempting this tutorial, you can also make it simpler by giving them payments with prefolded strains.
- Utilizing a contemporary, crisp greenback invoice of the proper dimension is essential for exact folds.
- Follow with common origami paper earlier than making an attempt it with payments.
This greenback invoice origami gown is a enjoyable and inventive option to give money items for birthdays, weddings, or as a part of present baskets. With easy steps and a contact of creativity, remodel small gadgets like a greenback invoice right into a sensible present that’s certain to impress!
MORE EASY greenback invoice origami TUTORIALS FROM KIDS ACTIVITIES BLOG:
Did you and your children get pleasure from making this greenback invoice origami gown?