Beautiful and Easy Dollar Bill Origami Butterfly

0

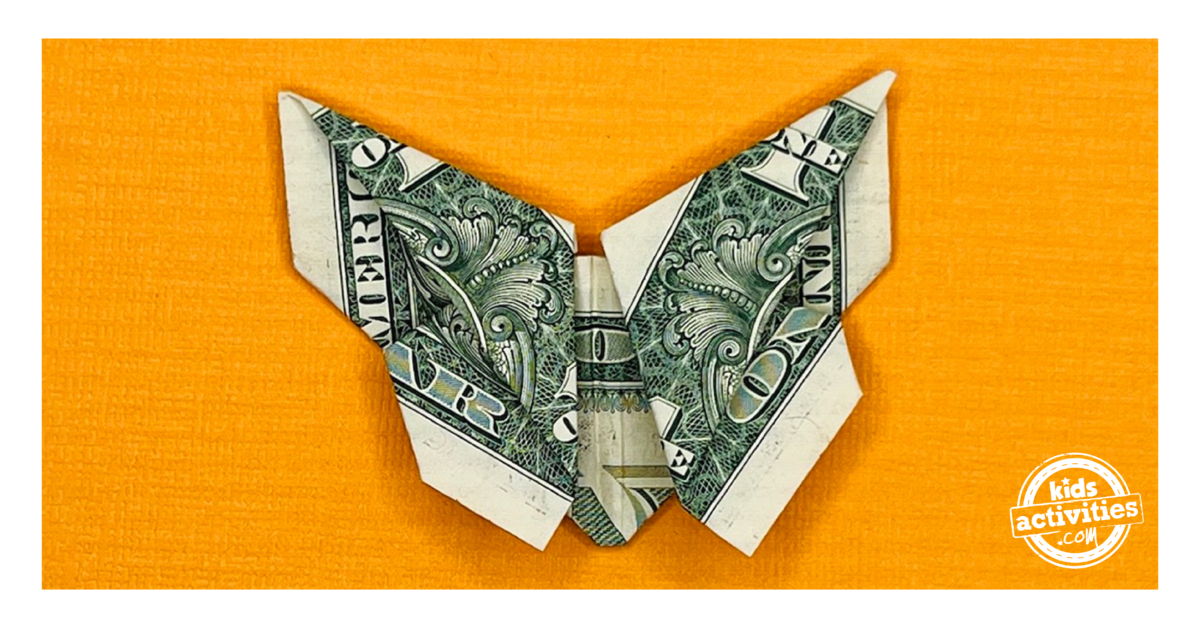
If you happen to’ve bought a kiddo that likes paper crafts, we’ve bought a enjoyable exercise for you as we speak! We’re making a greenback origami butterfly in 8 simple steps. Good for youthful and older youngsters, it’s a craft you are able to do wherever, anytime, and doesn’t take any prep! 

Go seize your greenback invoice and get began! Blissful folding!

Do you know you can also make a cash origami butterfly lei too?

Supplies Wanted

– One crisp greenback invoice

Directions:

Step 1

Begin with a crisp greenback invoice. Fold the invoice in half crosswise and unfold. Now, fold the invoice in lengthwise, creating the muse in your butterfly.

Dollar bill origami butterfly - Step 1 - Start with a crisp dollar bill. Tutorial from Kids Activities Blog
Let’s get began! Seize a crisp greenback invoice for this origami journey.
Dollar bill origami butterfly - Step 1 -  Fold the bill in half crosswise and unfold. Tutorial from Kids Activities Blog
Prepared, set, fold!
Dollar bill origami butterfly - Step 1 - unfold. Tutorial from Kids Activities Blog
Now unfold.
Dollar bill origami butterfly - Step 1 - Now fold the bill in lengthwise. Tutorial from Kids Activities Blog
Watch your butterfly unfold with every step.

Step 2 

Rotate the determine till the fold from the earlier step sits on the prime, with the free edges on the backside.

Dollar bill origami butterfly - Step 2 - Rotate the figure until the fold from the previous step sits at the top, with the free edges at the bottom. Tutorial from Kids Activities Blog
Folding will be enjoyable! Rotate the determine for the subsequent set of folds.

Step 3 

Fold each prime corners down and unfold them.

Dollar bill origami butterfly - Step 3 - Fold both top corners down and unfold them Tutorial from Kids Activities Blog
Dive into the world of greenback invoice origami with us.
Dollar bill origami butterfly - Step 3 -  unfold. Tutorial from Kids Activities Blog
Now unfold.
Dollar bill origami butterfly - Step 3 - Fold left top corner down. Tutorial from Kids Activities Blog
Fold the opposite nook too.
Dollar bill origami butterfly - Step 3 - Unfold left top corner. Tutorial from Kids Activities Blog
After which unfold it.

Step 4 

Use the creases you simply made to create an inside reverse fold on the precise and left corners.

Dollar bill origami butterfly - Step 4 - Use the creases you just made to execute an inside reverse fold on the right and left corners. Tutorial from Kids Activities Blog.
Crafting magic!
Dollar bill origami butterfly - Step 4 - Use the creases you just made to execute an inside reverse fold on the right and left corners. Tutorial from Kids Activities Blog
Make a triangle form on the prime nook.

Step 5

Fold the underside fringe of the highest layer backward till it meets the triangle.

Dollar bill origami butterfly - Step 4 - Fold the bottom edge of the top layer backward until it meets the triangle, establishing the base structure for your butterfly. Tutorial from Kids Activities Blog
Making this craft is a lot enjoyable!
Dollar bill origami butterfly - Step 4 - Use the creases you just made to execute an inside reverse fold on the right and left corners. Tutorial from Kids Activities Blog
Fold the underside edge backward to fulfill the highest, shaping the butterfly’s base.

Step 6: 

Fold the highest layer in half, and fold the opposite aspect of the invoice in half as nicely, be sure that it’s symmetric!

Dollar bill origami butterfly - Step 4 - Fold the top layer in half, and fold the other side of the bill in half as well, ensuring symmetry in your creation. Tutorial from Kids Activities Blog
Symmetry is essential!
Dollar bill origami butterfly - Step 4 - Fold the top layer in half, and fold the other side of the bill in half as well, ensuring symmetry in your creation. Tutorial from Kids Activities Blog
Flip it over and fold each side to create a balanced masterpiece.

Step 7:

Discover the slit within the backside middle of the invoice. Flip the determine the wrong way up and fold the left fringe of that slit down.

Dollar bill origami butterfly - Step 6 - Locate the slit in the bottom center of the bill. Turn the figure upside down and fold the left edge of that slit down. This crucial step lays the groundwork for the butterfly's distinctive features. Tutorial from Kids Activities Blog
Flip it the wrong way up.
Dollar bill origami butterfly - Step 6 - Locate the slit in the bottom center of the bill. Turn the figure upside down and fold the left edge of that slit down. This crucial step lays the groundwork for the butterfly's distinctive features. Tutorial from Kids Activities Blog
Prepare for the butterfly’s distinctive options.

Step 8:

Undo the fold and use that crease to open the flap on the left and proper aspect, bringing it down as proven within the footage. Flatten it rigorously, shaping the butterfly wings.

Dollar bill origami butterfly - Step 7 - Undo the fold and use that crease to open the flap on the left side, bringing it down as illustrated. Flatten it carefully, shaping the first of the butterfly's wings. Tutorial from Kids Activities Blog
Your butterfly is coming to life!

Step 9:

Repeat the method on the precise aspect of the determine to create the second wing.

Congratulations! Your Greenback Invoice Butterfly Origami is now able to flutter its wings. {giggles}

Ideas:

  • Experiment with different denominations for a colourful array of butterflies.
  • Minimize a pipe cleaner into two elements and glue them to the butterfly’s head to create antennae!
  • Play with completely different paper textures and colours so as to add a private contact to your creations.

Lively Time
quarter-hour

Complete Time
quarter-hour

Problem
simple

Estimated Price
$1

Notes

  • Experiment with different denominations for a colourful array of butterflies.
  • Minimize a pipe cleaner into two elements and glue them to the butterfly’s head to create antennae!
  • Play with completely different paper textures and colours so as to add a private contact to your creations.
  • MORE DOLLAR BILL ORIGAMI TUTORIALS FROM KIDS ACTIVITIES BLOG:

    Leave A Reply